
 My children's favorite uncle celebrated his birthday this week. It was the perfect opportunity to do something creative with this new Post-it Craft Paper. This paper is so easy to use . . . just cut, peel, and stick. Even younger children would find it user-friendly with no messy glue and with grids on the back to guide their scissors.
I thought that this new self-adhesive craft paper from 3M would be the perfect solution to a common problem. What do you do with gift bags that you've received, but do not want to re-use as-is. You may not like the design or the colors and theme might not fit the occasion. There could be a small crease in the bag or it may have had something taped to it. I use to just throw these bags away, but now I don't have to. This project also works with small handled paper shopping bags. That is what we ended up using to make this balloon-themed gift bag. The only thing you need to do is make sure that the handles, the left and right sides, and the bottom of the bag are in good condition.
Today's Project: Recycled Gift Bag with Balloons
Ask your child to give a previously-used gift bag or shopping bag a makeover with peel and stick craft paper.
Supplies Needed:
1) At least 5 colors of Post-it Craft Paper
2) A previously-used gift bag or shopping bag (with the body no larger than 8-1/2" x 11")
3) At least 1ft each of 3 different colors of narrow ribbon . . . can be satin, grosgrain, or curling ribbon).
4) A pencil
5) Scissors
6) Transparent tape
If you would like to make a coordinating greeting card, you will also need a plain manila folder. (I choose to use a folder because it is sturdier for creating this potential keepsake, but you can use any type of paper.)
Tip #1: When selecting a bag to re-use, make sure the left and right sides of the bag, which will not be covered, is a color that can work with your Post-it Craft Paper.

Step 1: Select a sheet of Post-it craft paper to be the background of one side of the gift bag. With the bag laying flat on the grid side of the paper, position the bag so that it is flush to the bottom left corner of the paper. Then trace the top and right sides of the bag with a pencil.
Step 2: Using scissors, cut along the pencil lines making sure to use the grid to cut your lines straight and smoothly.
Step 3: Peel off the paper backing to reveal the adhesive side of the paper. Then position the craft paper so that it lines up with the gift bag on all four sides, paying close attention to making the bottom line up perfectly. Then press the paper down to adhere the paper to the gift back.
Step 4: Repeat Steps 1 to 3 for the second side of the gift bag.


Step 5: Now cut a contrasting strip of Post-it Craft Paper for each side of the bag. Then stick it in place, while making sure it lines up well across the top.
Tip #2: Since we had paper leftover from the two background colors, we just used those two colors for our contrasting trim. It looks very well-coordinated.

Step 6: On the grid side of the paper, use a pencil to draw simple balloon shapes in various sizes. It would be ideal to make at least 3 different color balloons for each side of the gift bag. We made 3 for each side, but you can certainly opt to make more.
Step 7: Cut out the balloon shapes with scissors.


Step 8: Cut pieces of ribbon in 6" long segments. You will need one for each balloon you intend to show on the gift bag.
Step 9: Use a small piece of tape to secure the ribbons to wear you think the balloon strings might be on both sides of the bag.
Tip #3: If you or your child has trouble envisioning where the balloons will be, you can lay the balloon shapes on the bag while the backing is still on in order to get an idea of placement.


Step 10: Peel off the backing of each balloon and stick each onto the bag, making sure to completely conceal the pieces of tape used to secure the ends of the ribbon onto the bag.
Step 11: Trim the ribbon balloon strings so that the length does not go past the bottom of the gift bag.
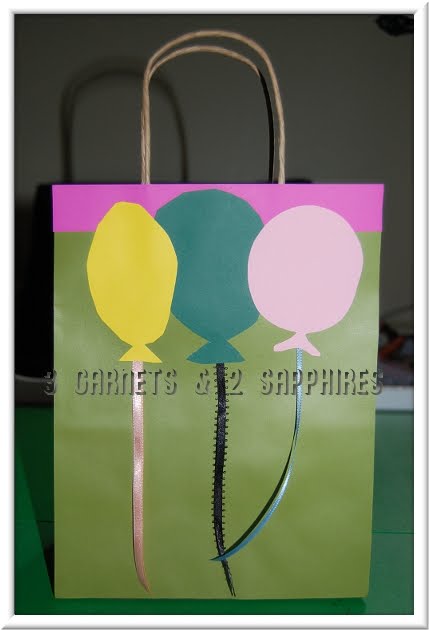
This is how our recycled gift bag turned out . . .

************************************************************
If you would like to make a coordinating card, simple cut your manila folder to the desired size. Then use the same colors of paper you used on the gift bag to cut out shapes to use in a collage on the front of the card. We used hearts, but you can cut out stars, abstract shapes, or something else. We also cut out the simple shapes of a cake, candle, and candle flame for the inside of the card.


Finished Card (Front)

Finished Card (Inside)
For more ideas about what you can do with Post-it Brand Craft Paper, visit the Post-it Project Gallery.
Thank you to 3M for sending us sample packs of Post-it Craft Paper free of charge to use for this project.
